Homelab Provisioning
2025 March
 mumbles something about cable management
My diskless homelab servers boot over network into a prebaked ramdisk (power-to-up is around 30s). I am so pleased with my setup it’s worth sharing my notes. It’s like booting into your favourite Docker image, but then on bare metal, though without Dockerfile convenience.
I often buy up used engineering samples of the latest CPUs, GPUs, NICs and SSDs. It’s often unclear how to get them to work - but I have been quite successful just swinging at it with different OS/kernels/kernel modules/drivers/etc, and then with their specific magic incantations. It’s super convenient to have a dynamic netboot setup if you’re playing with this stuff.
Iteration speed is the high order bit in getting things done, and your base image is so foundational, it’s worth investing in.
Overview
A simple network boot setup that:
- By default boots into a (zero-install) diskless (ramdisk) live Ubuntu 22.04 image, with hostname set and obtained through DHCP, and
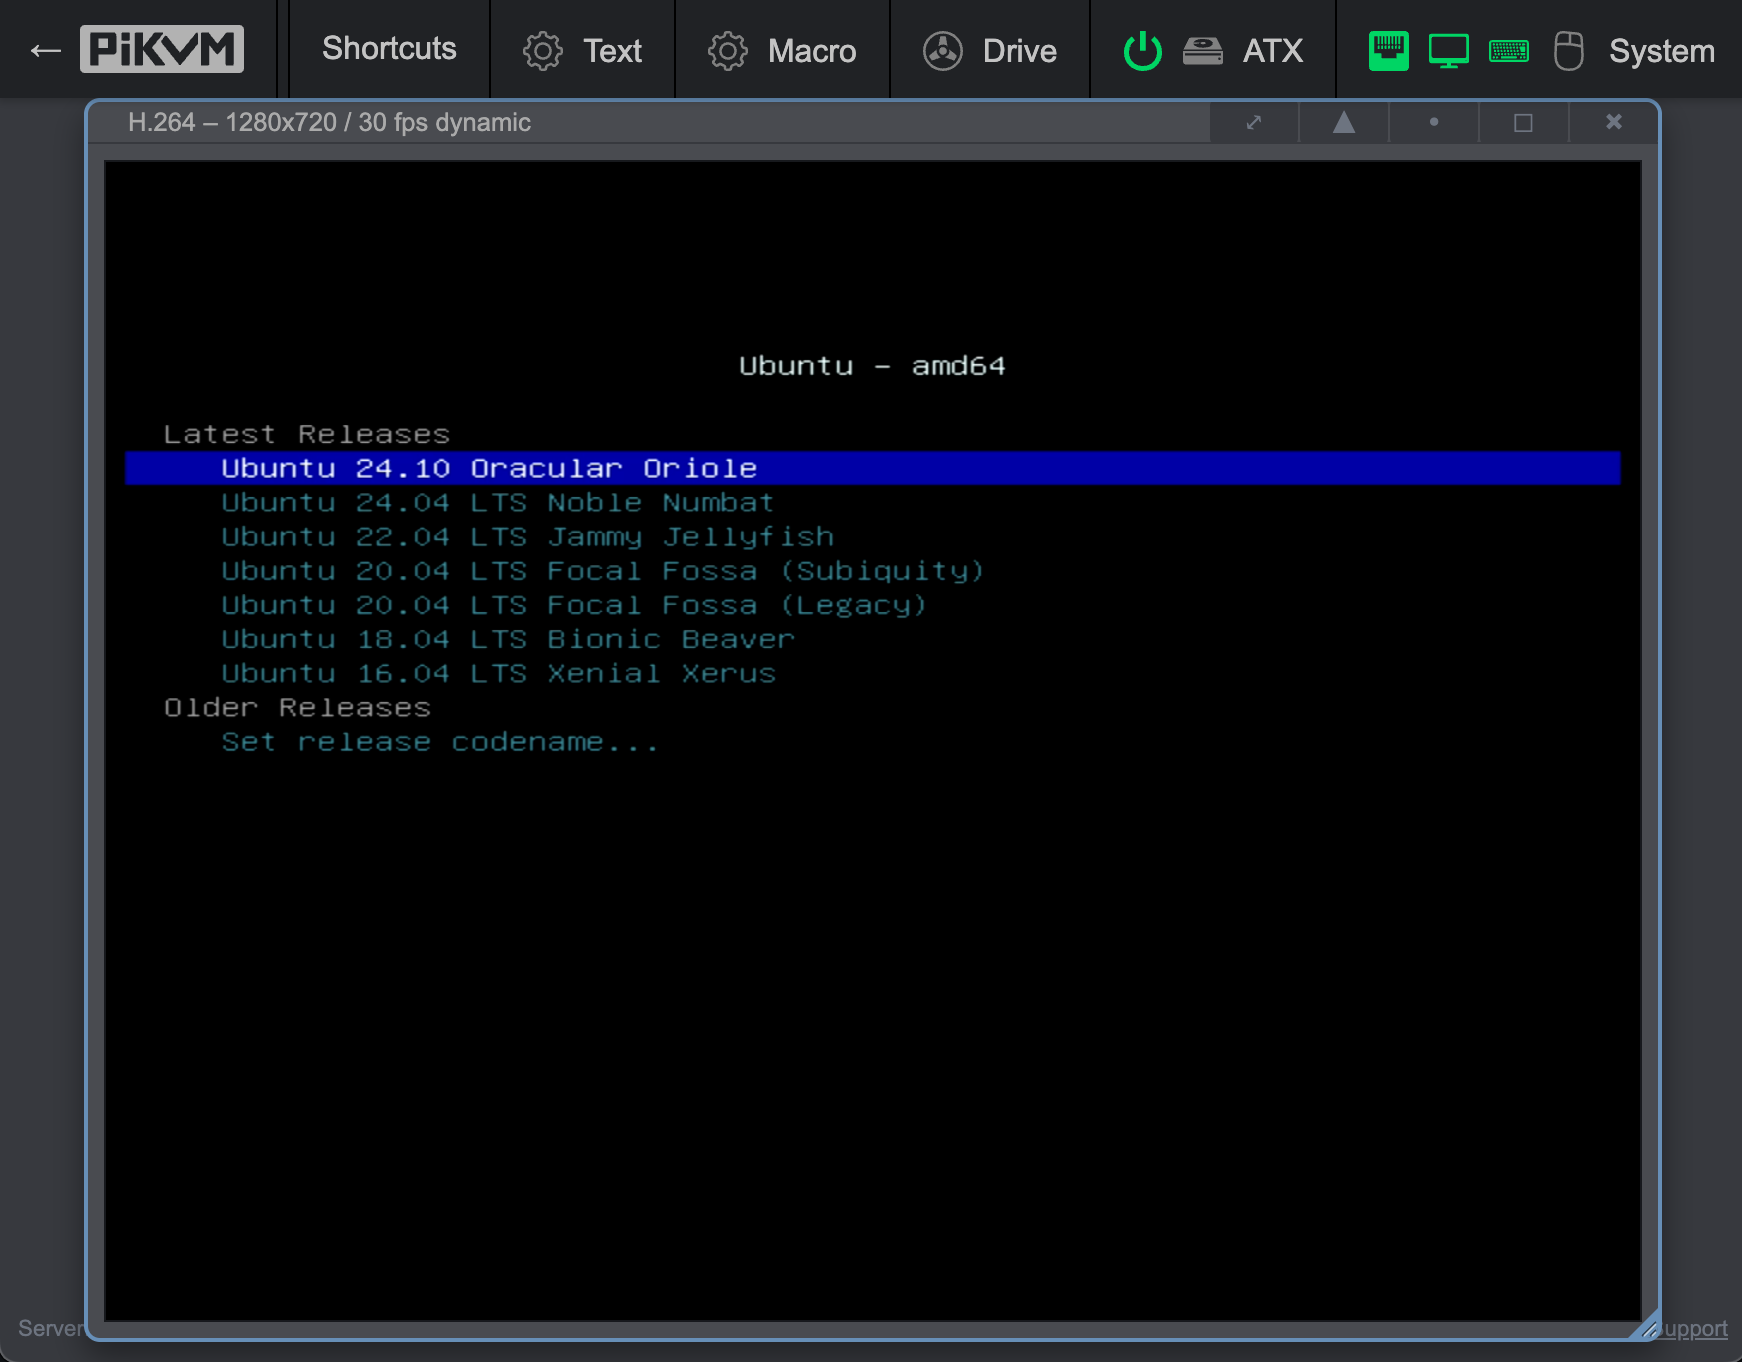
/homemounted through NFS. - Optionally boots into nearly any supported distribution (centos, debian, ubuntu, windows, etc) either for installation or into an official “live image”.
Prerequisites
This is a high-level overview of what you need and need to do. More concrete steps follow after.
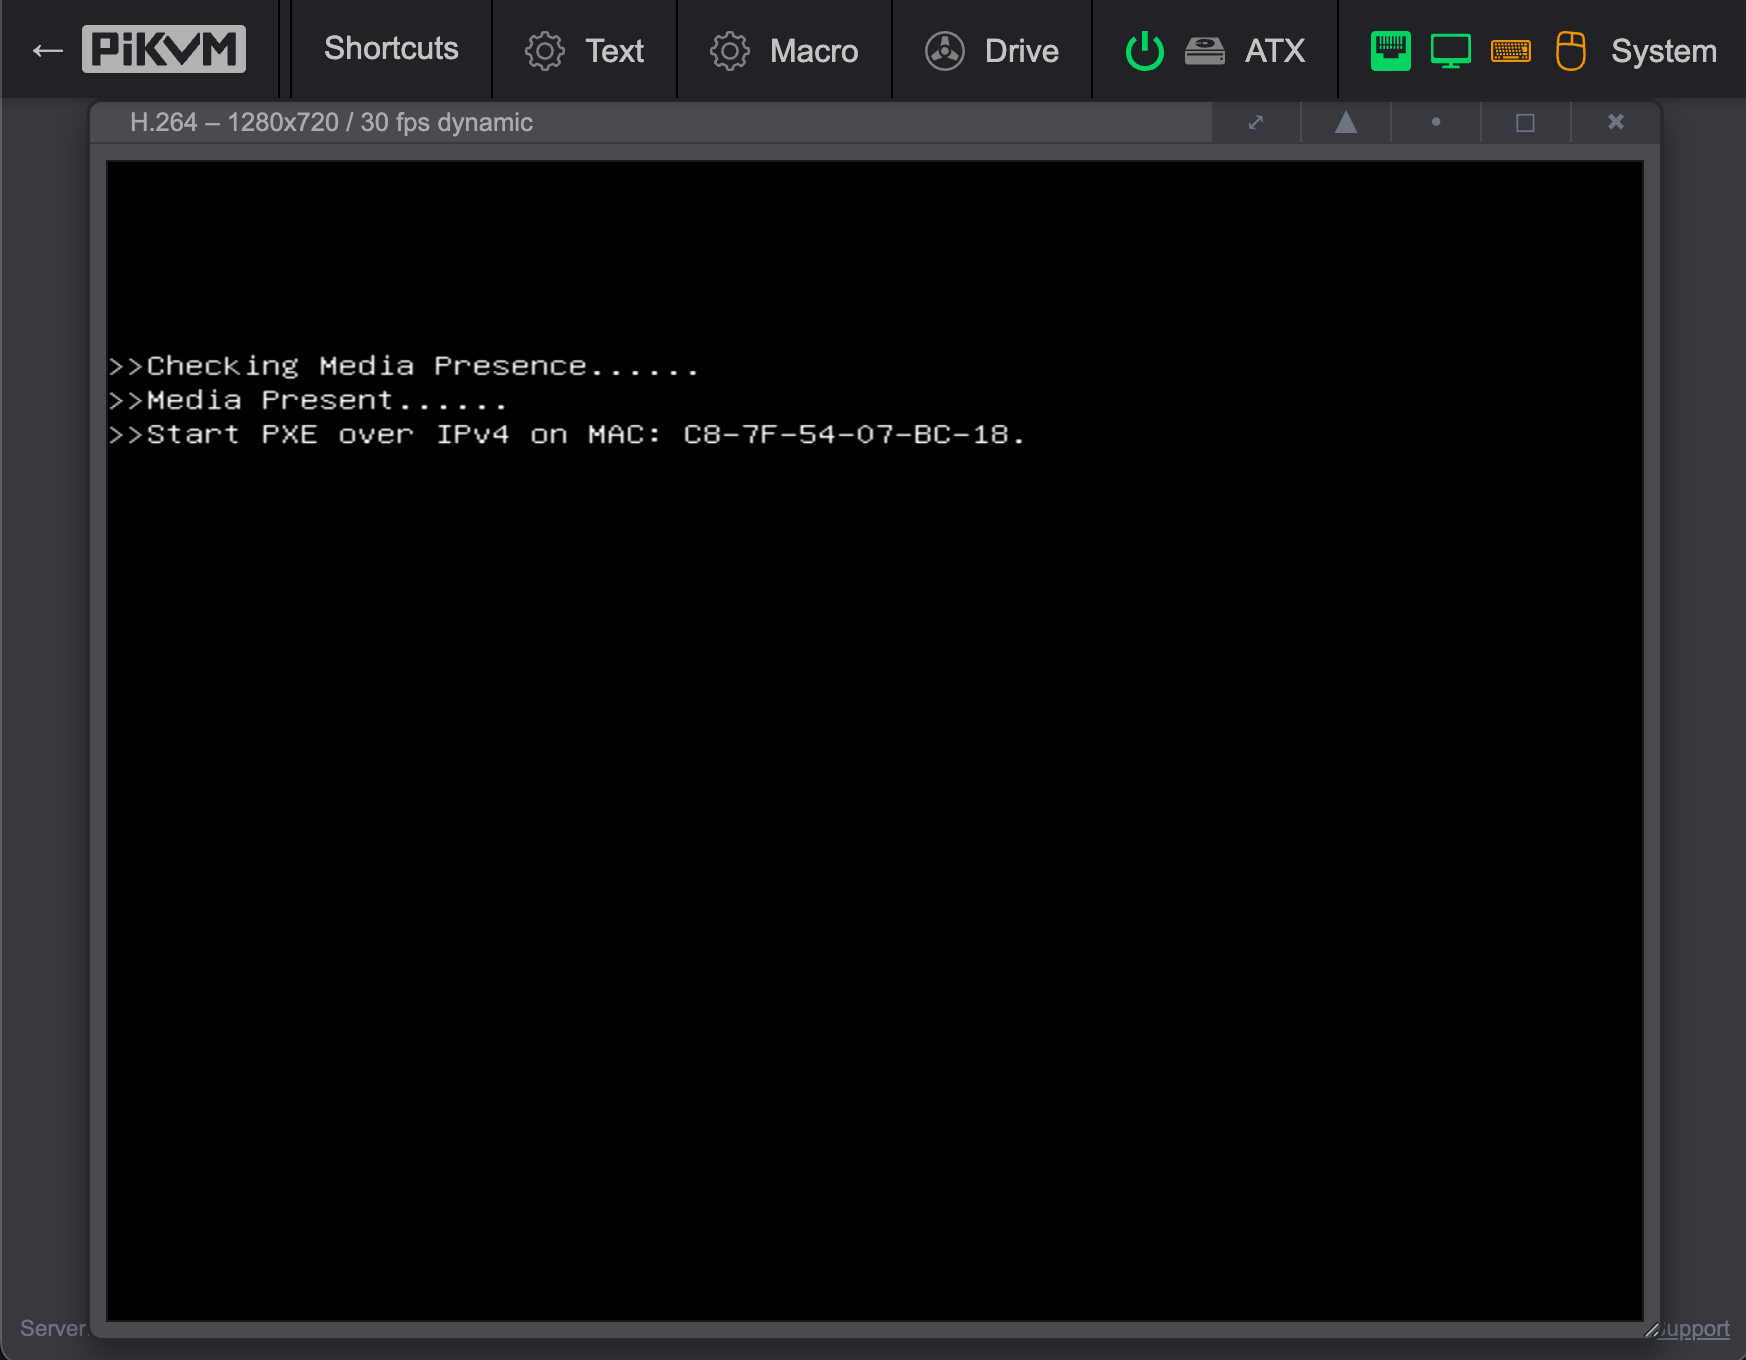
- DHCP and TFTP server When you PXE boot, you send a DHCP request for an ip and boot info. Your DHCP server will then offer this - but the boot information is in the form of an endpoint (server IP) and a bootloader filename on said server. A separate TFTP server is the basic and canonical way to host this file. The easiest way to co-host a DHCP and TFTP server is to use dnsmasq. Below I provide my configuration here. Make sure you turn off any other DHCP server on your subnet.
- NFS server This is where the GB-sized images are hosted. This can be used booted into ‘just-in-time’, or with the
toramkernel argument it’ll copy the whole image from the NFS into RAM of the client. - Boot file iPXE is a popular, open source and fancy implementation of a PXE bootloader. You can build your own iPXE bootloader, but netboot.xyz did all the work for you here. Netboot.xyz is a well maintained project with various iPXE menus, and can chainboot into dozens of different distros. I used
netboot.xyz.kpxefor standard pc bios bootloading andnetboot.xyz.efifor 64bit x86 EFI systems. I think this is what most homelab servers (non-ARM) use. Netboot.xyz provides amazing customization. There’s a lot of docs, but not super clear. For my purposes, I did not need to recompile any iPXE files.
Live Image: Kernel, Initramfs, Filesystem
Since you’re not writing a boot image from scratch, you have to start somewhere. Ideally, you do this in a reproducible way - so you don’t want to just convert your favourite server into a bootable version. As I wanted to use Ubuntu, there are only a few offically released base images: 22.* releases, 24.* releases. They only provide two types of ISOs:
- A “Desktop” image (eg
ubuntu-22.04.5-desktop-amd64.iso). This image can do live-install but also a live-session where it layers a pre-installed image on a ramdisk. - A “Live Server” image (eg
ubuntu-22.04.5-live-server-amd64.iso). This image is meant to ‘live-install’ but not ‘live to try’.
Canonical sadly stopped provide very minimal ISOs a few years back.
I decided to go with the Desktop image of Ubuntu 22. This has a solid live ramdisk setup builtin, and the Ubuntu 22 ISO is easier to work with, because it has only one filesystem.squashfs filesystem overlay. The Ubuntu 24 ISO has multiple layers, which makes it not very friendly for customizing for my purposes. The Ubuntu 24 ISO consists of (consecutive layers)
minimal.standard.live.squashfs(900MB) [HIGHEST LAYER - takes precedence]minimal.standard.squashfs(500MB) - has libreoffice and thunderbird and shit?minimal.squashfs(1.7GB) [BOTTOM-MOST LAYER]
FYI: you can actually replace minimal.standard.squashfs with an empty squashfs, in which case it won’t layer in any of the (imo) bloatware (thunderbird, libreoffice, etc).
Ok so lets move on with ubuntu-22.04.5-desktop-amd64.iso
[Optional] Just netboot that ISO
Provided you can drop into an iPXE shell (eg through Netboot.xyz), or compile your own iPXE, you can use something like this (there are many other ways too):
HTTP hosted; ISO on NFS
- Take files
casper/vmlinuzandcasper/initrdfrom your ISO and put them in the root of your TFTP server. - Mount your ISO somewhere (
mnt/iso) and host it through NFS (/etc/exports)
#!ipxe
imgfree
kernel vmlinuz boot=casper netboot=nfs nfsroot=192.168.10.10:/mnt/iso ip=dhcp
initrd initrd
boot
Customizing your image
The boot process is a chain of events, and your ISO encapsulates most of these components. The web is full of overly complicated steps, but I’ve distilled it down to the below. Even this isn’t minimal, I am applying various patches with personal customizations
#!/bin/bash

set -e

EXPECTED_SHA256="bfd1cee02bc4f35db939e69b934ba49a39a378797ce9aee20f6e3e3e728fefbf"
IMAGE_NAME="image-$(date +%Y-%m-%d-%H%M%S)"
TMP_DIR="/tmp/${IMAGE_NAME}"

echo "Final image name: ${IMAGE_NAME}"
echo "Temporary directory: ${TMP_DIR}"

echo "deb http://archive.ubuntu.com/ubuntu jammy universe" | sudo tee /etc/apt/sources.list.d/universe.list

sudo apt-get update
sudo apt-get install -y xorriso squashfs-tools initramfs-tools patch

mkdir -p "${TMP_DIR}"

sudo mkdir -p /srv/nfs/images

# Obtain the iso
wget -O /srv/nfs/images/ubuntu-22.04.5-desktop-amd64.iso https://releases.ubuntu.com/22.04/ubuntu-22.04.5-desktop-amd64.iso

echo "${EXPECTED_SHA256} /srv/nfs/images/ubuntu-22.04.5-desktop-amd64.iso" | sha256sum -c

mkdir -p "${TMP_DIR}/extracted"
mkdir -p "${TMP_DIR}/extracted_unsquash"
mkdir -p "${TMP_DIR}/extracted_initrd"

# Extract the ISO. You can't use 7z here, xorriso is built for this.
xorriso -osirrox on -indev /srv/nfs/images/ubuntu-22.04.5-desktop-amd64.iso -extract / "${TMP_DIR}/extracted"

# Unsquash the filesystem.squashfs, the final filesystem we will eventually swap/init into.
unsquashfs -f -d "${TMP_DIR}/extracted_unsquash" "${TMP_DIR}/extracted/casper/filesystem.squashfs"

# Optionally update the squashfs filesystem, eg with apt installs etc
cp "../../boot_image/update_image.sh" "${TMP_DIR}/update_image.sh"
chmod +x "${TMP_DIR}/update_image.sh"

"${TMP_DIR}/update_image.sh" "${TMP_DIR}/extracted_unsquash"

# Unpack the initramfs so we can edit it
unmkinitramfs -v "${TMP_DIR}/extracted/casper/initrd" "${TMP_DIR}/extracted_initrd"

# Optionally add patches to the initrd and the filesystem
cp "../../boot_image/initrd.patch" "${TMP_DIR}/initrd.patch"
cp "../../boot_image/filesystem.patch" "${TMP_DIR}/filesystem.patch"

patch -p1 -d "${TMP_DIR}/extracted_initrd" < "${TMP_DIR}/initrd.patch"
patch -p1 -d "${TMP_DIR}/extracted_unsquash" < "${TMP_DIR}/filesystem.patch"

# Reconstitute the initrd using https://github.com/xuancong84/netboot/blob/main/mkinitrd.sh
"../../boot_image/mkinitrd.sh" "${TMP_DIR}/extracted_initrd" "${TMP_DIR}/new-initrd"

# Reconstitute the squashfs
mksquashfs "${TMP_DIR}/extracted_unsquash" "${TMP_DIR}/new-filesystem.squashfs"

# Put the thing back together again
cp "${TMP_DIR}/new-filesystem.squashfs" "${TMP_DIR}/extracted/casper/filesystem.squashfs"
cp "${TMP_DIR}/new-initrd" "${TMP_DIR}/extracted/casper/initrd"

sudo mv "${TMP_DIR}/extracted" "/srv/nfs/images/${IMAGE_NAME}"

echo "Boot image creation completed successfully!"
# NOTE: you do not end up with an ISO, because I like hosting the filesystem through NFS
(OPTIONAL) When my image came up, the DNS configuration wasn’t correctly propagated into the final live image. This was fixed if you turned off/on networking, or requested a new lease, or just apply this patch (as used in script above)
filesystem.patch
diff -ruN extracted_unsquash/etc/netplan/01-network-manager-all.yaml edit/etc/netplan/01-network-manager-all.yaml
--- extracted_unsquash/etc/netplan/01-network-manager-all.yaml  2024-09-11 07:25:35.000000000 -0700
+++ edit/etc/netplan/01-network-manager-all.yaml        2025-03-26 17:16:26.028997844 -0700
@@ -1,4 +1,16 @@
-# Let NetworkManager manage all devices on this system
+# Let networkd manage all devices on this system
 network:
   version: 2
-  renderer: NetworkManager
+  renderer: networkd
+  ethernets:
+    all-en:
+      match:
+        name: "en*"
+      dhcp4: true
+      dhcp-identifier: mac
+    all-eth:
+      match:
+        name: "eth*"
+      dhcp4: true
+      dhcp-identifier: mac
+
(OPTIONAL) I wanted the live image’ hostname to be set from the DHCP hint (which didn’t natively work) so I needed to patch this (part of initrd.patch):
diff -ruN extracted_initrd/main/scripts/casper-bottom/18hostname /home/tzaman/initrdmount/main/scripts/casper-bottom/18hostname
--- extracted_initrd/main/scripts/casper-bottom/18hostname	2020-05-05 01:56:54.000000000 -0700
+++ /home/tzaman/initrdmount/main/scripts/casper-bottom/18hostname	2025-03-23 21:44:00.551674797 -0700
@@ -20,7 +20,14 @@

 log_begin_msg "$DESCRIPTION"

-echo "$HOST" > /root/etc/hostname
+# echo "$HOST" > /root/etc/hostname  # NOTE(tzaman): I removed this
+# NOTE(tzaman): Added:
+echo "Explicitly setting hostname from dhclient.leases (content:)"
+cat /var/lib/dhcp/dhclient.leases
+DHCP_HOSTNAME=$(grep -m1 'option host-name' /var/lib/dhcp/dhclient.leases | cut -d'"' -f2)
+echo "$DHCP_HOSTNAME" > /root/etc/hostname
+echo "DHCP_HOSTNAME: $DHCP_HOSTNAME"
+
 cat > /root/etc/hosts <<EOF
 127.0.0.1 localhost
 127.0.1.1 $HOST
(OPTIONAL) And then to make your home directory hosted over NFS, you can do something like
 diff -ruN extracted_initrd/main/scripts/casper-bottom/99casperboot /home/tzaman/initrdmount/main/scripts/casper-bottom/99casperboot
--- extracted_initrd/main/scripts/casper-bottom/99casperboot	2020-05-05 01:56:54.000000000 -0700
+++ /home/tzaman/initrdmount/main/scripts/casper-bottom/99casperboot	2025-03-24 09:46:17.940243430 -0700
@@ -16,3 +16,24 @@
 esac

 touch /run/.casper-boot
+
+# NOTE(tzaman): Added:
+#Mount home over NFS
+echo "Mounting /home over NFS.."
+rm -rf "${rootmnt}/home"  # NOTE(tzaman): Seems to be ok.
+mkdir "${rootmnt}/home"
+mount -o rw,port=2049,nolock,proto=tcp beta.lab:/srv/nfs/home "${rootmnt}/home"
+mkdir /root/home/$USERNAME
+chroot /root chown $USERNAME:$USERNAME /home/$USERNAME/
+echo "Done mounting /home."
+
Finally, if you want to change your filesystem.squashfs, easiest is to unsquash this (per script above) and then do something like the below. This script is called in my main script above. The TLDR is, that you mount {sys, proc, dev, run, dev/pts}, then through chroot issue the commands you want, and then they’ll be forever part of your ISO.
update_image.sh
#!/bin/bash

# Use the first argument as TARGET, or fallback to environment variable
if [ -n "$1" ]; then
    TARGET="$1"
fi

# Check if TARGET is set
if [ -z "${TARGET}" ]; then
    echo "Error: Target directory not specified!"
    echo "Usage: $0 /path/to/target/directory"
    exit 1
fi

# Cleanup function to ensure proper unmounting
cleanup() {
    echo "Performing cleanup..."
    # Check if mounts exist before trying to unmount
    if mountpoint -q ${TARGET}/dev/pts; then
        sudo -n umount ${TARGET}/dev/pts
    fi
    if mountpoint -q ${TARGET}/dev; then
        sudo -n umount ${TARGET}/dev
    fi
    if mountpoint -q ${TARGET}/proc; then
        sudo -n umount ${TARGET}/proc
    fi
    if mountpoint -q ${TARGET}/sys; then
        sudo -n umount ${TARGET}/sys
    fi
    if mountpoint -q ${TARGET}/run; then
        sudo -n umount ${TARGET}/run
    fi
    echo "Cleanup complete"
}

# Set trap to call cleanup function on script exit, interrupt, or error
trap cleanup EXIT INT TERM

# Check if TARGET directory exists
if [ ! -d "${TARGET}" ]; then
    echo "Error: Target directory ${TARGET} does not exist!"
    exit 1
fi

set -x

# Mount necessary filesystems
sudo -n mount -n -o bind /sys ${TARGET}/sys
sudo -n mount -n -o bind /proc ${TARGET}/proc
sudo -n mount -n -o bind /dev ${TARGET}/dev
sudo -n mount -n -o bind /run ${TARGET}/run
sudo -n mount -n -o bind /dev/pts ${TARGET}/dev/pts

# Use DEBIAN_FRONTEND=noninteractive to avoid prompts
sudo -n chroot ${TARGET} apt update
sudo -n chroot ${TARGET} DEBIAN_FRONTEND=noninteractive apt purge -y libreoffice-* gnome-* thunderbird* firefox* xserver* rhythmbox* printer-driver-* plymouth-* nautilus-* libx11-* snap* zfsutils-linux zsys
sudo -n chroot ${TARGET} DEBIAN_FRONTEND=noninteractive apt autoremove -y
sudo -n chroot ${TARGET} apt install -y --no-install-recommends vim samba nfs-kernel-server rsync openssh-server git whois curl

# TODO: Install rust (`curl https://sh.rustup.rs -sSf | sh`)

# Configure git globally
sudo -n chroot ${TARGET} git config --global user.email "$YOUR_EMAIL"
sudo -n chroot ${TARGET} git config --global user.name "$YOUR_NAME"

# Set timezone using timedatectl
sudo -n chroot ${TARGET} timedatectl set-timezone America/Los_Angeles

# Remove stuff, we're using `sh` to make sure the expansion happens inside
sudo -n chroot ${TARGET} sh -c "rm -rf /home/*/snap /snap /var/snap /var/lib/snapd"
sudo -n chroot ${TARGET} sh -c "rm -rf /var/cache/apt/* /var/tmp/* /tmp/*"
sudo -n chroot ${TARGET} sh -c "rm -rf /var/crash/* /var/backups/*"
sudo -n chroot ${TARGET} sh -c "rm -rf /home/*/.cache/*"
sudo -n chroot ${TARGET} sh -c "rm -rf /etc/update-motd.d/*"
Netboot iPXE
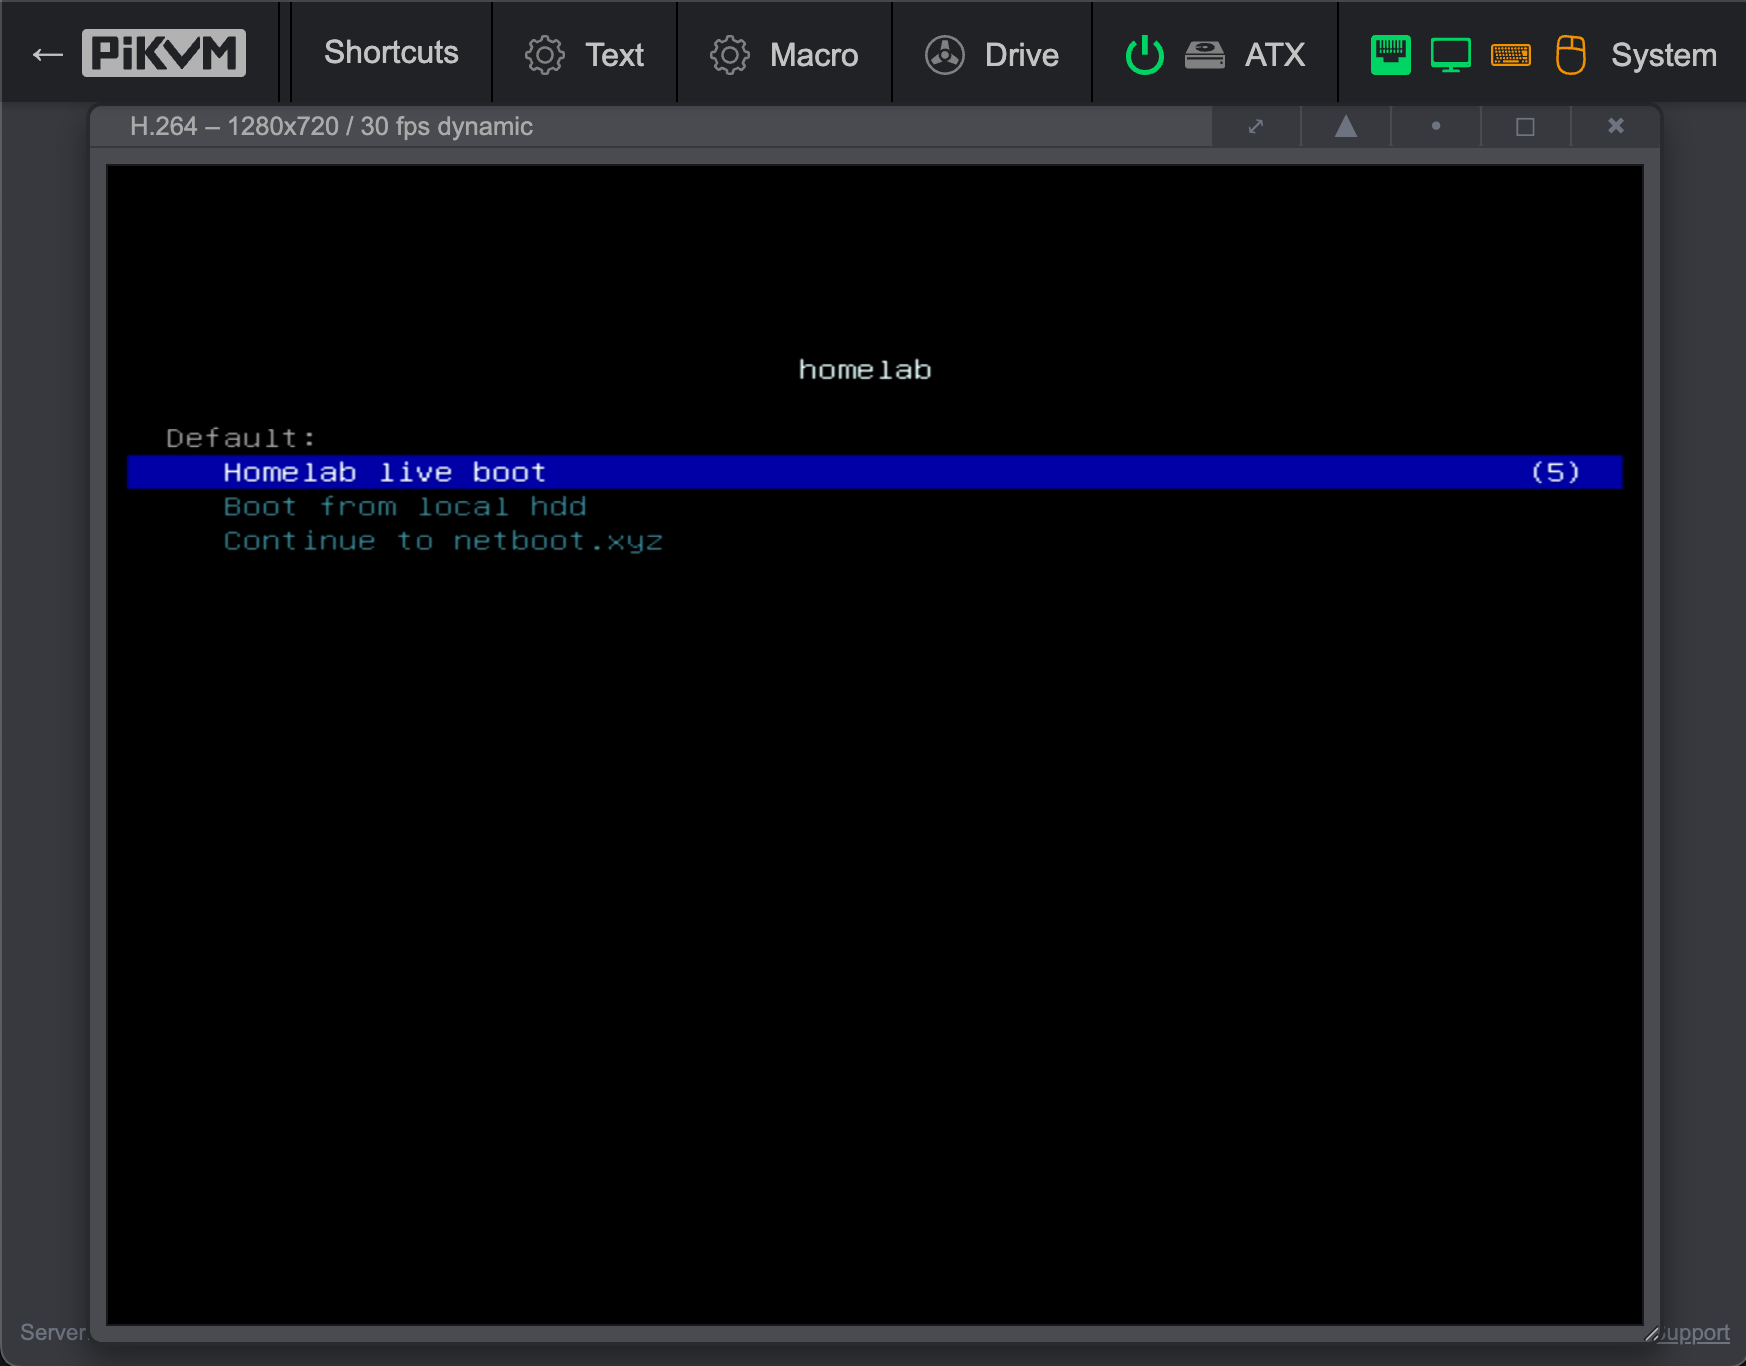
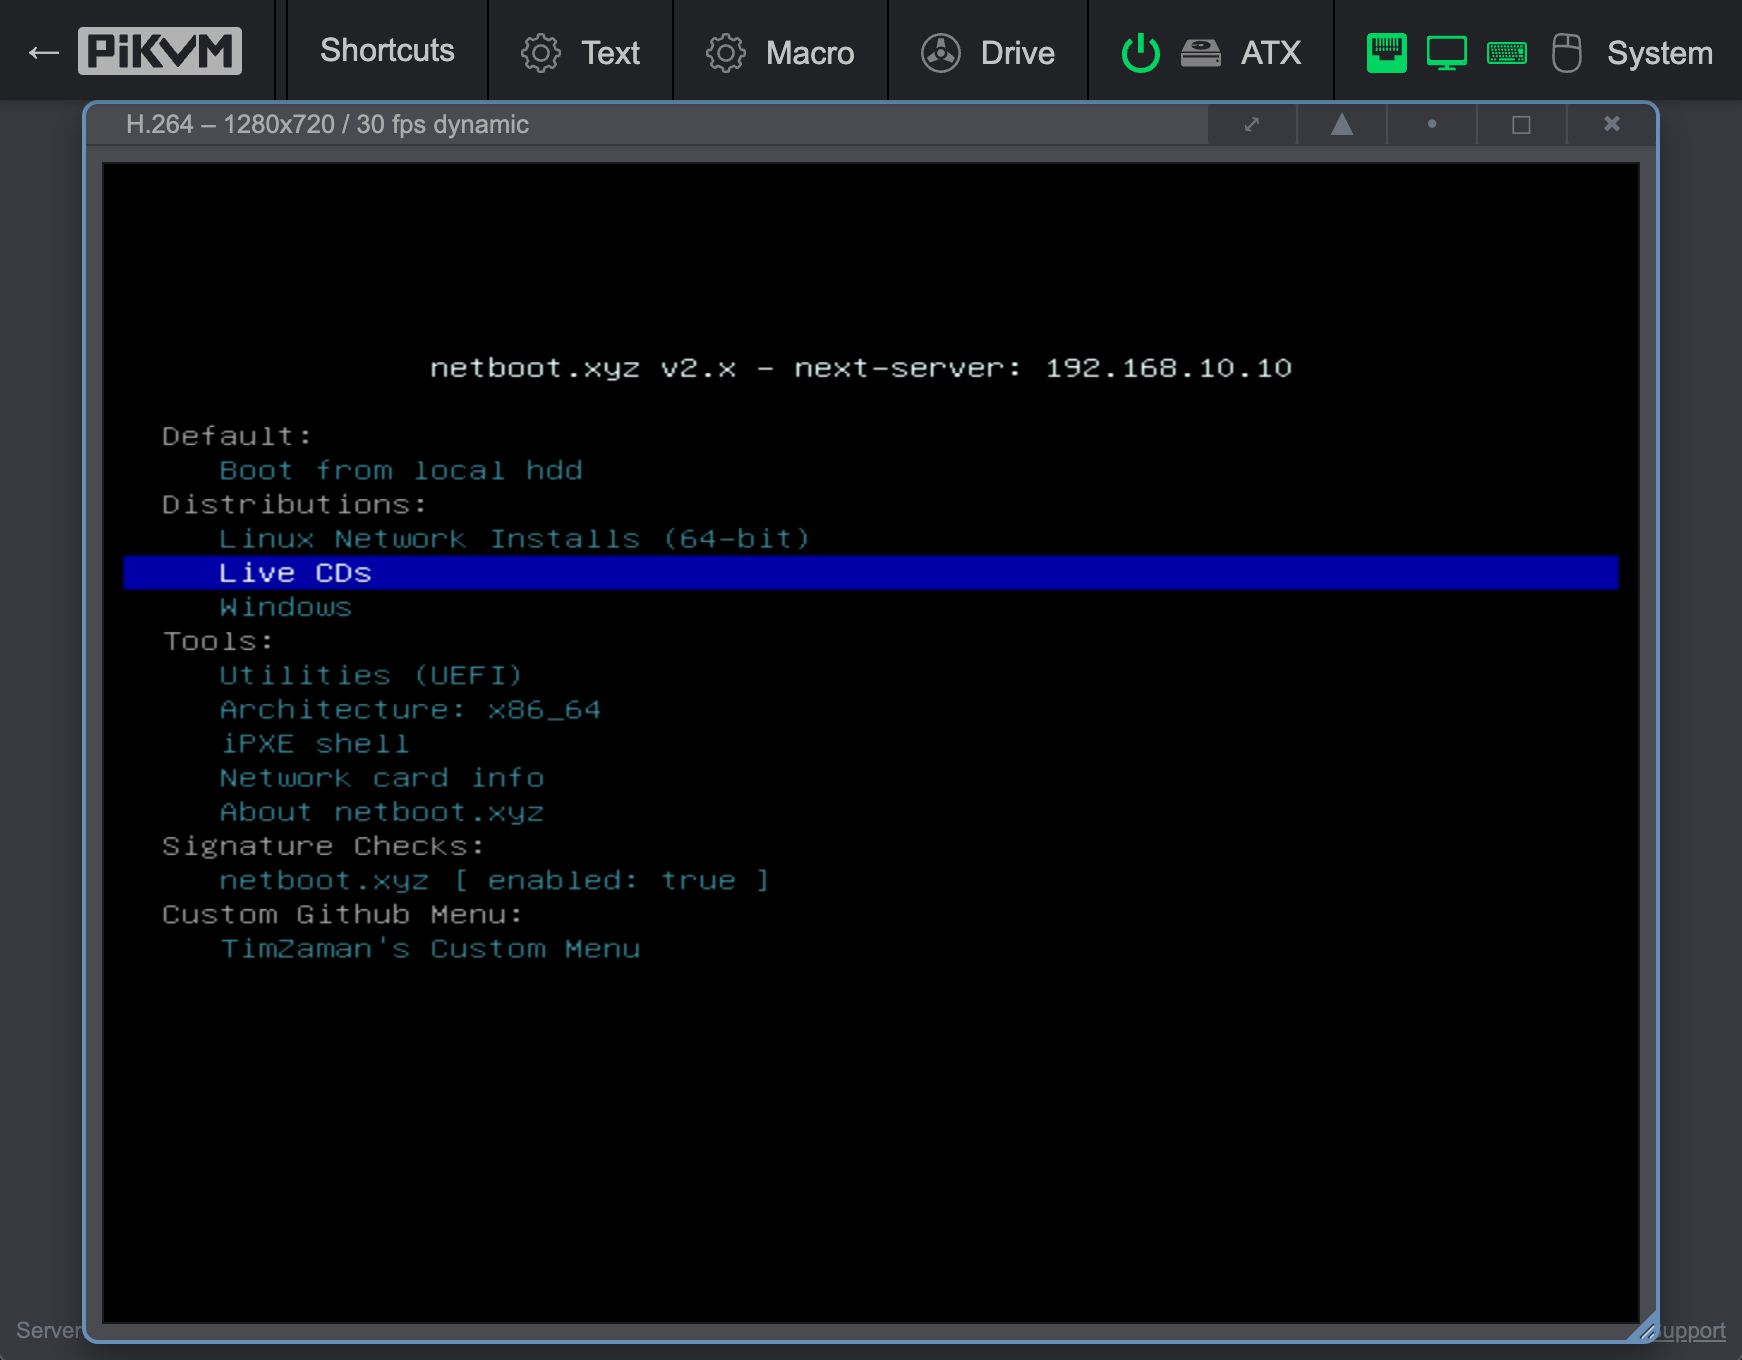
After customizing iPXE directly, I figured I would often like to try different distro’s, so I should use Netboot.xyz, which is built on iPXE itself. Netboot.xyz has a bit of an odd ansible setup to build things and customize. However, it’s design is actually sound, and documentation is wide, but the docs were not super clear to me. It turns out that the design of Netboot.xyz is actually very solid and modular, and just providing the following files gave me everything I wanted:
- Boot into a menu that by default (5s timeout) will boot into my homelab live image
- Optionally boot from disk
- Optionally chain into the Netboot.xyz interface.
homelab.ipxe
#!ipxe
imgfree
set nfs_host 192.168.10.12
set image_name
kernel nfs://${nfs_host}/srv/nfs/images/${image_name}/casper/vmlinuz
initrd nfs://${nfs_host}/srv/nfs/images/${image_name}/casper/initrd
imgargs vmlinuz ip=dhcp boot=casper netboot=nfs nfsroot=${nfs_host}:/srv/nfs/images/${image_name} username=tzaman systemd.unit=multi-user.target hostname=localhost textonly
boot
local-vars.ipxe
#!ipxe
set site_name homelab
set boot_timeout 5000
set github_user TimZaman
menu.ipxe
#!ipxe

:start

:main_menu
clear custom_choice
clear menu
set space:hex 20:20
set space ${space:string}

menu ${site_name}
item --gap Default:
item homelab_ipxe ${space} Homelab live boot
item local ${space} Boot from local hdd
item custom_exit ${space} Continue to netboot.xyz
isset ${menu} && set timeout 0 || set timeout ${boot_timeout}
choose --timeout ${timeout} --default homelab_ipxe menu || goto homelab_ipxe
echo ${cls}
goto ${menu} ||
goto change_menu

:change_menu
chain ${menu}.ipxe || goto error
goto main_menu

:error
echo Error occurred, press any key to return to menu ...
prompt
goto main_menu

:local
echo Booting from local disks ...
exit 1

:homelab_ipxe
echo Booting from homelab.ipxe...
chain homelab.ipxe || echo TFTP connection failed, returning to menu in 30 seconds...
sleep 30
goto main_menu

:custom_exit
chain utils.ipxe
exit
DHCP, DNS, TFTP
Dnsmasq provides the core network services for our homelab. It handles DNS, DHCP, and TFTP server functions in a single lightweight package, making it perfect for homelab provisioning.
# DHCP Configuration
dhcp-range=192.168.10.100,192.168.10.200,48h
dhcp-option=option:router,192.168.10.1
dhcp-option=option:dns-server,192.168.10.10
dhcp-authoritative

# Static hostname assignment
dhcp-host=9c:5c:8e:bb:bb:54,id:*,192.168.10.12,beta,30d
dhcp-host=c8:7f:54:07:bc:18,id:*,192.168.10.15,epsilon,30d
dhcp-host=3c:ec:ef:de:a5:84,id:*,192.168.10.16,zeta,30d
dhcp-host=3c:ec:ef:de:a5:85,id:*,192.168.10.17,zeta,30d
dhcp-host=3c:ec:ef:de:a9:81,id:*,192.168.10.20,zeta-bmc,30d
dhcp-host=76:56:3c:52:f1:44,id:*,192.168.10.18,eta-bmc,30d
dhcp-host=74:56:3c:52:f1:43,id:*,192.168.10.19,eta,30d

# PXE Boot Configuration
enable-tftp
tftp-root=/srv/tftp
# Standard PC BIOS
dhcp-match=set:bios,60,PXEClient:Arch:00000
dhcp-boot=tag:bios,netboot.xyz.kpxe
# 64-bit x86 EFI
dhcp-match=set:efi64,60,PXEClient:Arch:00007
dhcp-boot=tag:efi64,netboot.xyz.efi

# DNS Configuration
expand-hosts
domain=lab
server=8.8.8.8
server=8.8.4.4
no-resolv
Various Notes
- During boot, my client id was not deterministic (see RFC 2132 section 9.14 about DHCP client identifiers). That meant that it would get assigned a dynamic IP address that wasn’t tied to the actual host or the actual MAC address. So I had to set
id:*in my dnsmasq config to force usage of MAC on the server side, and on the client side setdhcp-identifier: macin your netplan. - If you use Netboot.xyz and you want different hosts to boot into different configs, you can change their files through adding a
HOSTNAME-${hostname}.ipxeorMAC-${mac:hexraw}.ipxefile to your TFTP root and that’ll take presedence.